Showing posts with label day of the dead. Show all posts

Saturday, May 28, 2011

Rediscoveries

I've had a bunch of stuff packed up the last few months while we remodel. But, now we're unpacking and I'm finding pieces I hadn't yet photographed. So, I'll be putting up some of those pics soon. Also, I just made a gelaskin from my silk art-- I used "jacaranda and marigolds"


GelaSkins - Protection with Style. Not Bulk.
From Art To Dye For
for the front and wallpaper, and "circle of friends" for the back.
From Art To Dye For

Saturday, March 12, 2011

Hawaiian Inspiration

These are a couple of scarves that I made for a commission a few months back. These represent a trip made by a couple of friends to Hawaii. I love how all the colors sparkle on the silk. These are made on a matte silk-- a crepe; one practice one I made on a satin silk. I'm always torn between satin and crepe they both have really interesting characteristics.

Friday, April 2, 2010

Taking Pictures

Here's a new scarf before steaming. You can see the resist line and also the vanishing blue pen lines that I used to plan the painting.


In these two pictures, I"m trying to work out how to take the darn pics! I try to get the detail, and in the upper one I"m trying to capture the entire scarf, but it's hard to do. I think certainly you can get a feel for the sheen of the silk and the detail of the painting, but not a good feel for the whole scarf put together. I'll keep working on it.

Sunday, February 14, 2010

Tuesday, October 27, 2009

Another grant, another painting

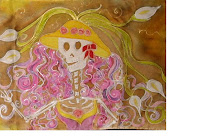
I actually painted three scarves, but here is a new day of the dead one. I thought I'd try something different. I've been wanting to do one in black and white.

Friday, October 16, 2009

The Reveal


So, last time I talked about how I steam the silk scarves after dying them. Here, you can see the roll of paper and scarves. Next, you see a corner revealed. I tear off the paper-- the resist sticks to the paper, but that will wash off. Meanwhile, I try to get as much of the paper off the silk. Finally, you see the whole picture (the one above has already been highlighted with paint).

Friday, July 31, 2009

Square Scarf


So, here's a new scarf I'm working on. It's 3 feet by 3 feet. There are 4 skeletons on it and they are holding hands. I had attempted one before, but it didn't work out, but after the other two square quilts I attempted a day of the dead scarf on a square again. This time I'm very pleased with how it's turning out. I'm thinking after steaming and finishing that I'll photograph it to make a card.

Saturday, January 10, 2009

Valentines in Progress

I'm working on a Valentine's themed day of the dead scarf. Note the cactus. That's because love can be prickly.


Sunday, November 9, 2008

The Steps


A lot of people ask me how I go from a blank silk scarf to the finished product. I explain this process here.


First the silk is washed to remove any remaining residue that might interfere with the dye. Next, the silk is stretched on a frame. Rubber bands and hooks hold the silk taut. Next, I plan the painting, sketching directly on the silk using a special fading pen. I apply a water-based resist to the parts of the painting that will be white (see picture above). The resist forms a border which keeps the dye from spreading into the next area.


The next step is beginning to apply the dye. First the lightest colors and the foreground colors are applied (see illustration on right). Other considerations are how the colors will blend with the next colors planned in a given area. In the example you can see the shapes starting to form.


The process of adding dye and drawing with resist is repeated until the entire design is complete. Sometimes the dye breaks through the border and the results are incorporated into the painting (I call these happy accidents). After the silk dries more color may be added for additional depth. The background is painted in last and is kept wet for an even finish.


Here you see the almost complete piece. The lines are dried resist. The scarf is then steam set for about 2 hours. The resist is rinsed out with hot water. Textile detergent is added in the final rinse to stop the dye from bleeding. Highlighting with metallic paints is the final step. The piece is then ironed to set the paints.